
Visual Merchandising
Stall Presentation & Merchandising
Make your food the reason people stop.
A farmers’ market should make people excited about food, curious about where it comes from and keen to take something home. Your stall is part of that experience. Give your products the care and character that went into growing or making them.
We expect stalls to look clean, considered and inviting throughout the morning. Achieving that does not require expensive fittings or a professionally designed stall. A few affordable changes can make a substantial difference.
A memorable display does not need a large budget. It needs a clear identity, appealing food and a few thoughtful choices. Every producer should look like themselves, with their own colours, materials and story.
Start by looking from the customer’s side
Once you have set up, walk out in front of your stall. Approach it from each direction customers will come from.
- Can someone immediately tell what I sell?
- Can they see the products at the back?
- Are names and prices easy to read?
- Can they comfortably browse, choose and pay?
- Is anything distracting from the food?
Take a photograph from this position. It can reveal empty spaces, hidden products and clutter that you don’t notice when standing behind the table.
Start with your story
What would help someone recognise your business before they read a label? It might be a favourite colour, a photograph of your farm, a piece of equipment from your trade or a cupboard that connects with your history.
Use a clear sign across the front of your marquee showing your business name and what you sell. Make the back of the stall work too: a banner, farm photograph or short producer story gives customers something meaningful to see at eye level.
Build around genuine connections. A honey producer might display a clean, empty hive frame with a short explanation. A baker might use bread boards, a flour sack or a family recipe photograph. Choose a few useful pieces that support the food and leave room to shop.
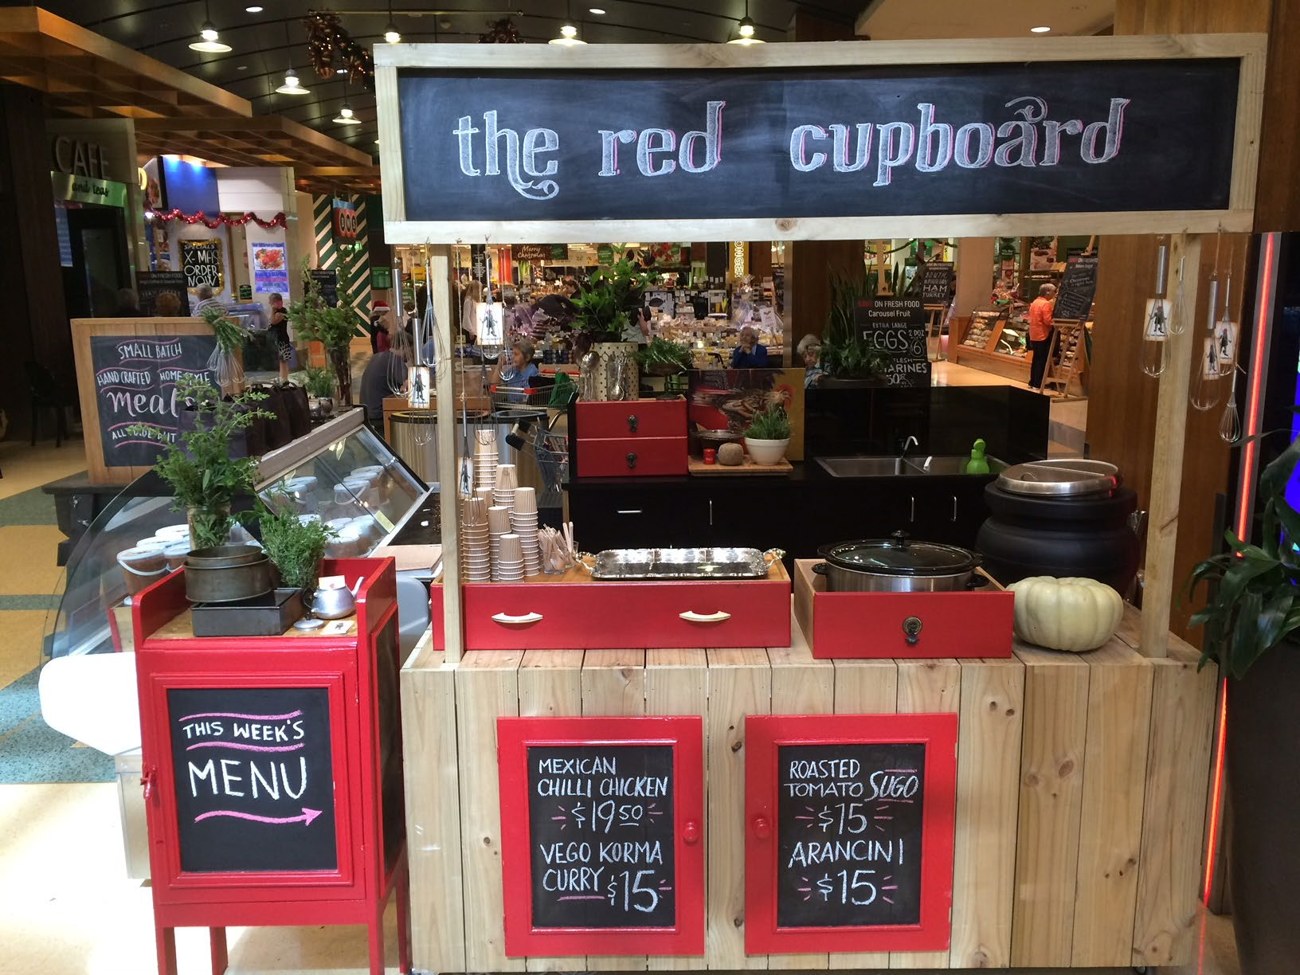
A story becomes a stall
The Red Cupboard example turns a family story into a distinctive display. Red drawers, timber and chalkboards carry the same idea through the stall.
Start with something true about your own business and choose materials that express it.
Original Visual Merchandising Guidelines, page 11. Reference photograph; adapt the display idea to your own stall.
Give your display a farmers’ market character
There is no single farmers’ market look. Timber, wicker, galvanised metal, wire baskets, ceramic cake stands, cotton, linen and hessian can all work. A painted cupboard or a simple shelf may suit your business better than another covered trestle. Keep coverings neat and clear of the ground.
Hessian is an option, rather than a uniform. A white or blue cloth can work beautifully with the right products and branding. A sound timber table may need no cloth at all. Keep coverings neat and conceal spare stock, bags and equipment.
Look for second-hand cake stands, baskets, trays, small shelves and cupboards. Reuse what you already have before buying more. Choose stable, cleanable pieces that travel well. Keep unpackaged food on suitable food-contact surfaces or protected with appropriate liners.
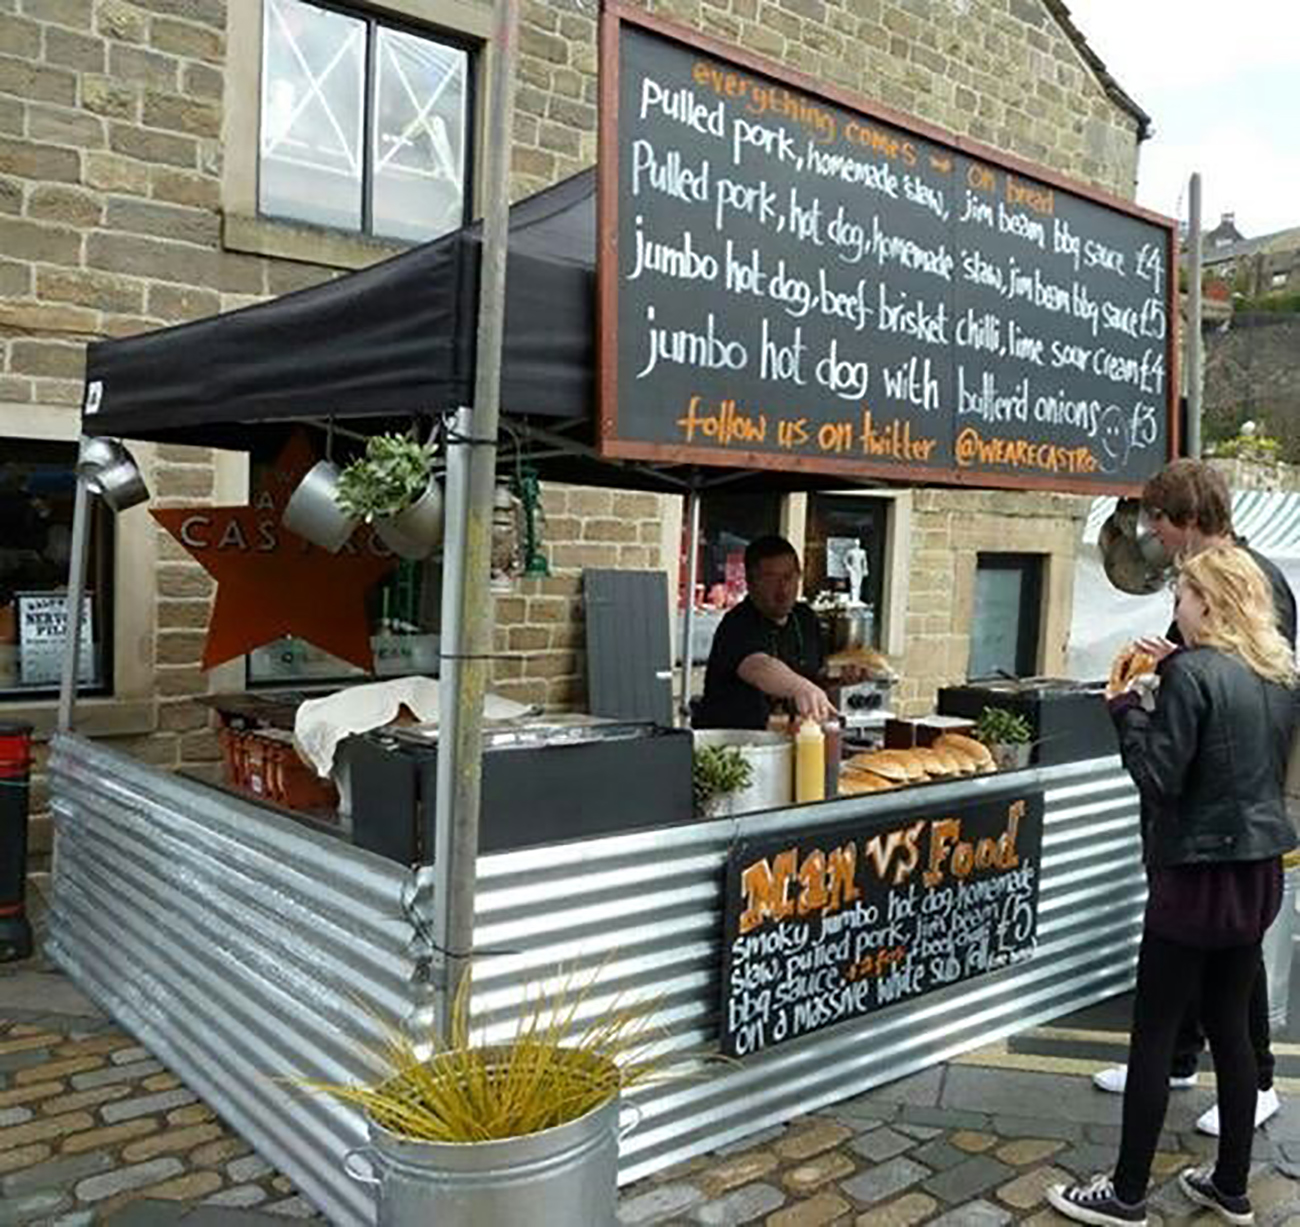
A different material changes the whole frontage
The galvanised surround in the guide gives the stall a practical agricultural character and conceals storage.
Think about the front of your stall as part of the display, not just the space beneath the table.
Original Visual Merchandising Guidelines, page 6. Reference photograph; adapt the display idea to your own stall.
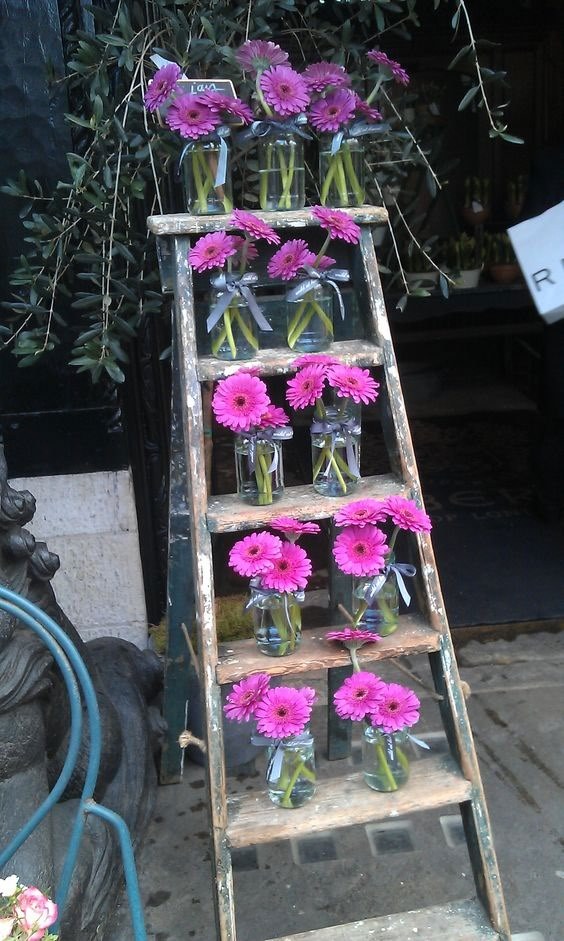
A ladder creates height for flowers
A ladder turns a small footprint into a display at several heights, making different bunches easy to see.
Secure the ladder and containers, keep flowers within comfortable reach and place the display where customers can browse without blocking access.
Build upwards, then make it easy to reach
A flat row of products disappears behind the first row. Create two or three levels with secure risers, shelves, crates or stands. Place a strong feature where approaching customers can see it, then keep the products they will pick up within easy reach.
- Cakes and baking: use different cake stands, boards and trays, with suitable covers. Show a whole cake alongside clearly identified portions.
- Jams, honey and sauces: use stepped shelves, shallow baskets or timber risers. Face labels forward and group flavours clearly.
- Fresh produce, outdoors: use angled crates, shelving and generous baskets. Let seasonal colour and the shape of the produce create the impact.
- Refrigerated products: group products neatly, face labels forward and keep the glass clear. Use suitable display fittings without blocking airflow or compromising refrigeration.
Props should earn their space. They can raise a product, organise a range or explain your story. Keep sightlines to your team open and avoid fragile towers or displays customers cannot shop.
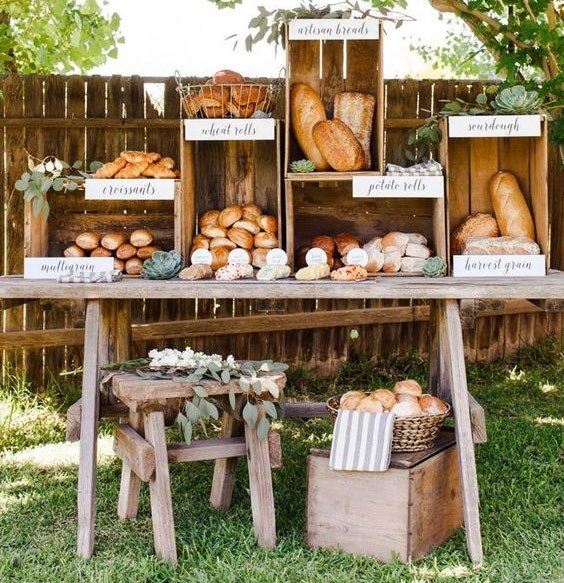
Baskets and trays work together
This original example combines grouped bottles, baskets and trays instead of lining everything across a bare table. Repeat a material within your own stall to create order, while giving each product group a clear place.
Original Visual Merchandising Guidelines, page 14. Reference photograph; adapt the display idea to your own stall.
Let the produce create the theatre
For outdoor fresh produce stalls, the harvest itself can be the display. Think about bunches, shapes, texture and colour as well as quantity. A bold seasonal feature gives customers a reason to pause.
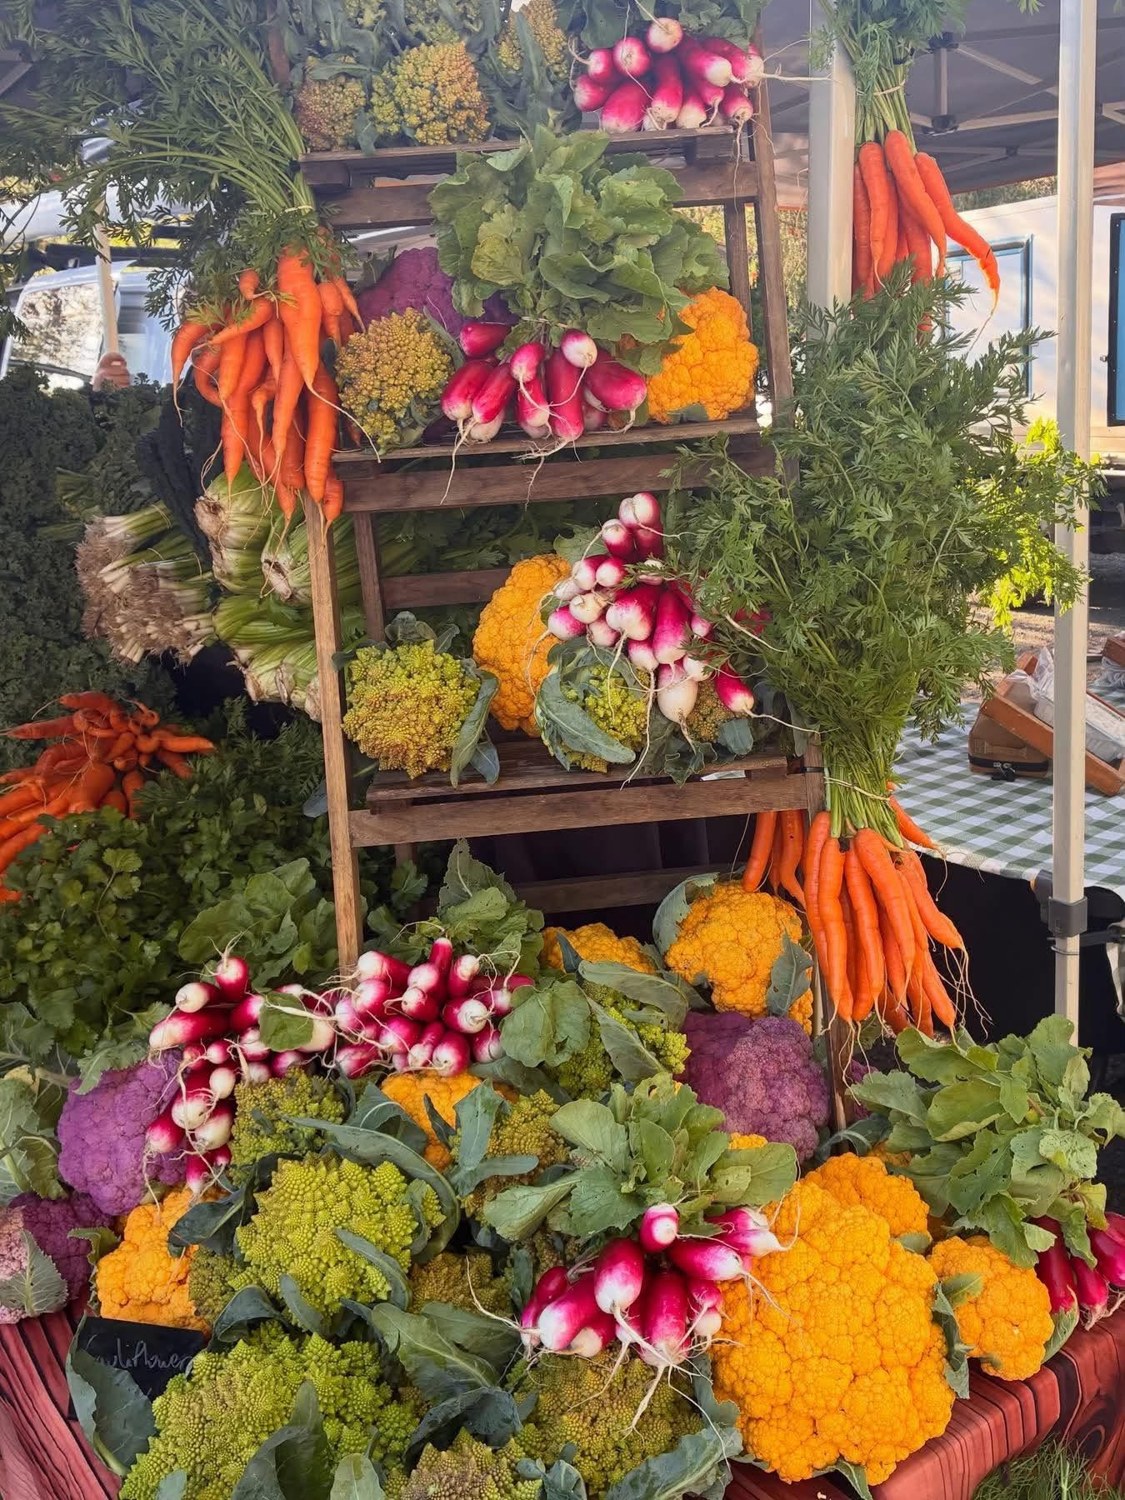
Outdoor fresh produce inspirationTimber shelving lifts colourful cauliflower and radishes into view, while hanging carrot bunches frame the display.
The produce supplies the colour and texture. Try a smaller seasonal feature with securely supported shelving, replenishable stock and a clear place for customers to select their purchase.
Reference image supplied for this section. Fresh produce displays belong outdoors at Byron Bay Market.
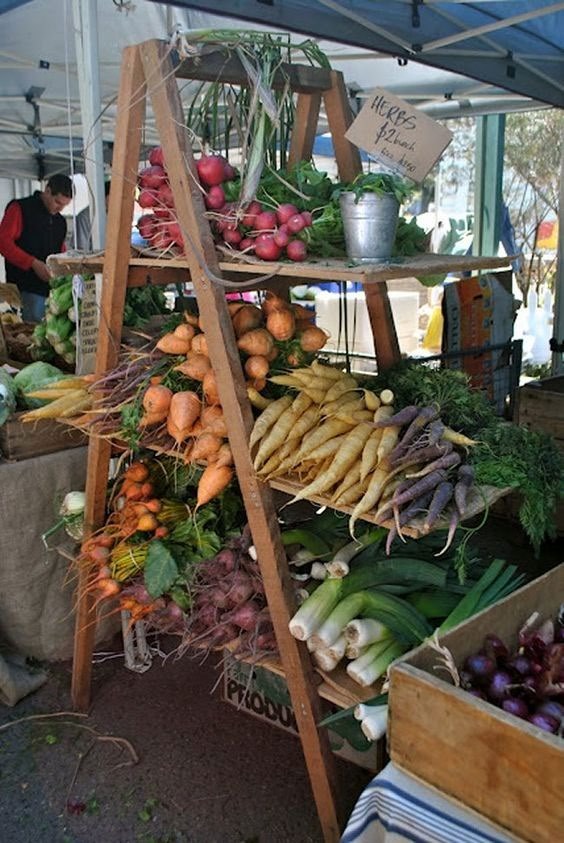
Timber shelving brings the harvest into view An A-frame display presents vegetables
Original Visual Merchandising Guidelines, page 15. Reference photograph; adapt the display idea to your own stall.
Keep the display honest. If something has sold out, say so and help customers find an alternative. For small or high-value products, a compact arrangement often works better than stock spread across an oversized table. Group related products so customers can understand your range quickly. Give a seasonal favourite or new product a clear focal point, and place complementary products nearby. As stock sells, bring it forward and move into smaller baskets or trays. Remove empty containers and close gaps. A smaller, full display looks more inviting than stock spread thinly across a large table. Adjust the presentation to what you actually have available. Each product must show its normal price, with the members price underneath. The members price is 10% off the normal price. Use consistent, readable tickets within your own branding and make the unit clear. Calculate the members price by multiplying the normal price by 0.90. Add useful product information where it helps customers choose, without crowding the price. The original photographs are display inspiration. Their historic signs are not templates for ASFM’s current two-price requirement. Lighting is mandatory for indoor stalls. Direct LED spotlights onto the products, the person serving and the backdrop so all three are clearly visible. Check the result from the customer’s side and adjust lights that cause glare or cast shadows over the food. Festoon lights can add atmosphere, but they do not replace directed merchandising lighting. Customers need to see the detail of your food and recognise the person they are buying from. Give tastings an obvious, uncluttered place with a clear invitation and an identifiable product. Keep the matching products for sale close by. Use appropriate covers and serving utensils, following the market’s food safety requirements. Leave room for customers to put down their shopping, choose products and pay. Keep the payment point visible, and make your team easy to recognise through aprons, clothing or colours that suit your business. Carry your branding through to packaging. Use compostable packaging suited to the food, such as appropriate paper bags or no-window cardboard boxes. Check the packaging specification rather than assuming a clear film is compostable. Keep the finished packs tidy, labelled and ready to take home. Indoor stalls sit under their own 3 m × 3 m marquees, side by side along both sides of the enclosed pavilion. Build the character within your own space, with a clear front sign, a considered backdrop and a display that welcomes customers from the aisle. Fresh produce is displayed outdoors. Borrow the ideas for colour, height, materials and storytelling, then apply them to your allocated ASFM stall. Use these examples to compare materials, branding and product arrangements. Choose the ideas that fit your business, rather than copying a complete stall. The professional guide’s photographs throughout this page remain the starting point; these additional concepts show other possibilities.
Keep it abundant throughout the morning
Make the prices easy to understand
Normal price $10.00
Members price $9.00
Light the food, the person and the backdrop
Make tasting and buying feel easy
Adapt the idea to your market space
Inspiration gallery: find your own approach
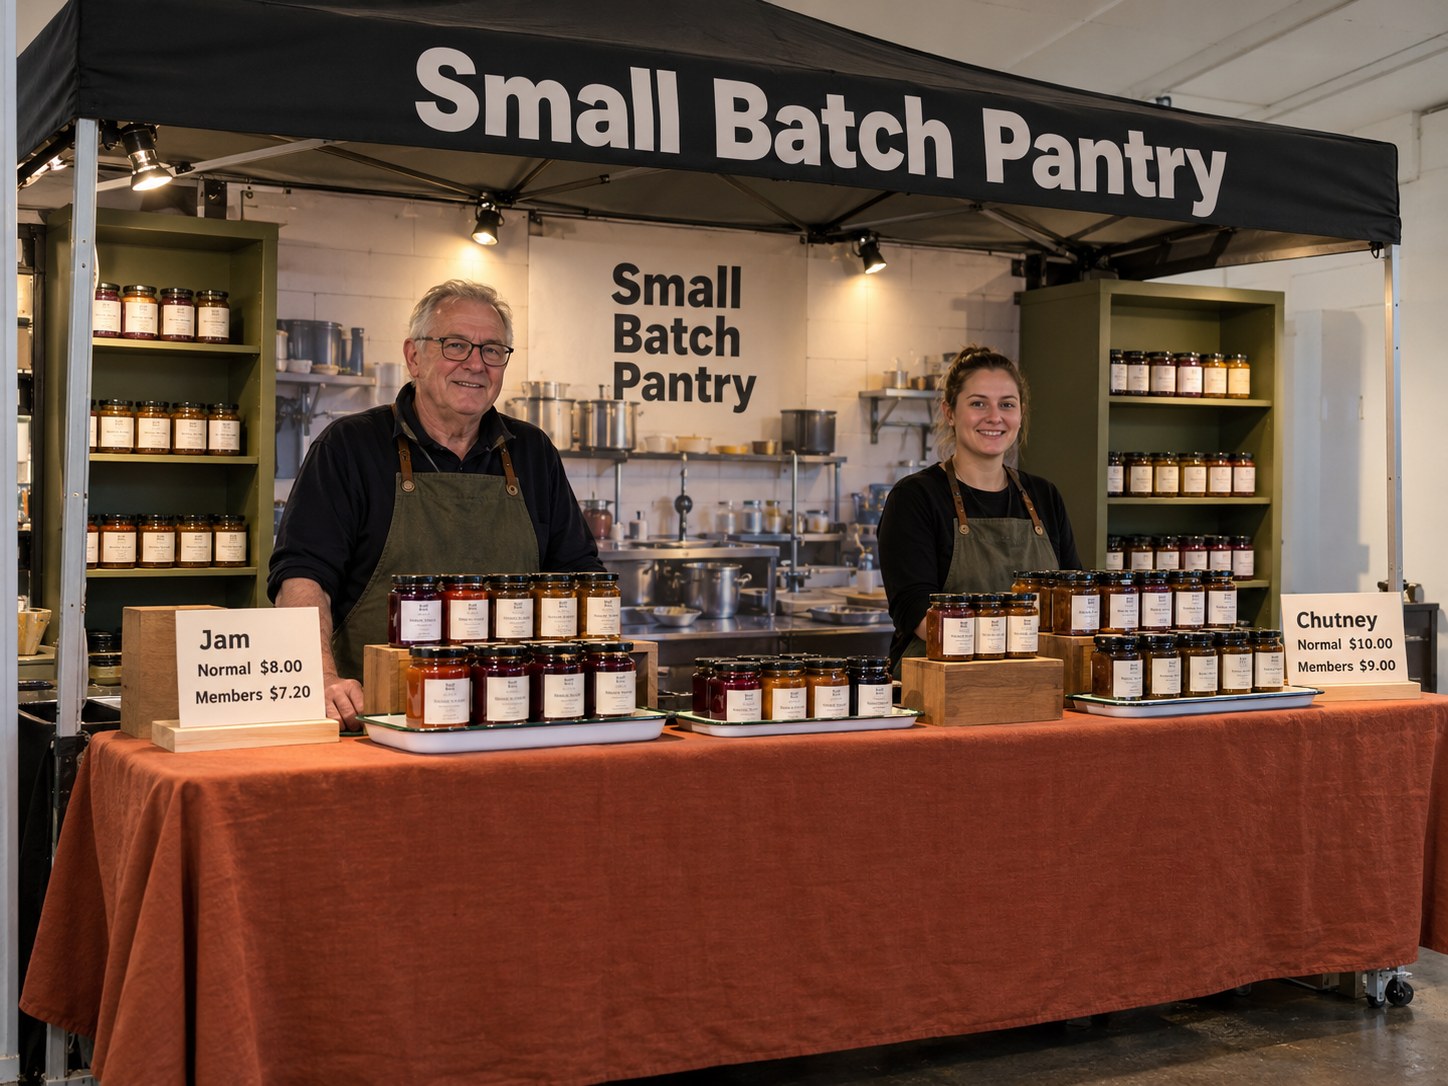
Painted shelving and a warm cotton frontage
Dark branding, painted cupboards, enamel trays and timber risers create a clear pantry identity.
The colour comes from the business and its display materials. Cupboards need an appropriate mobile base before use at the market.
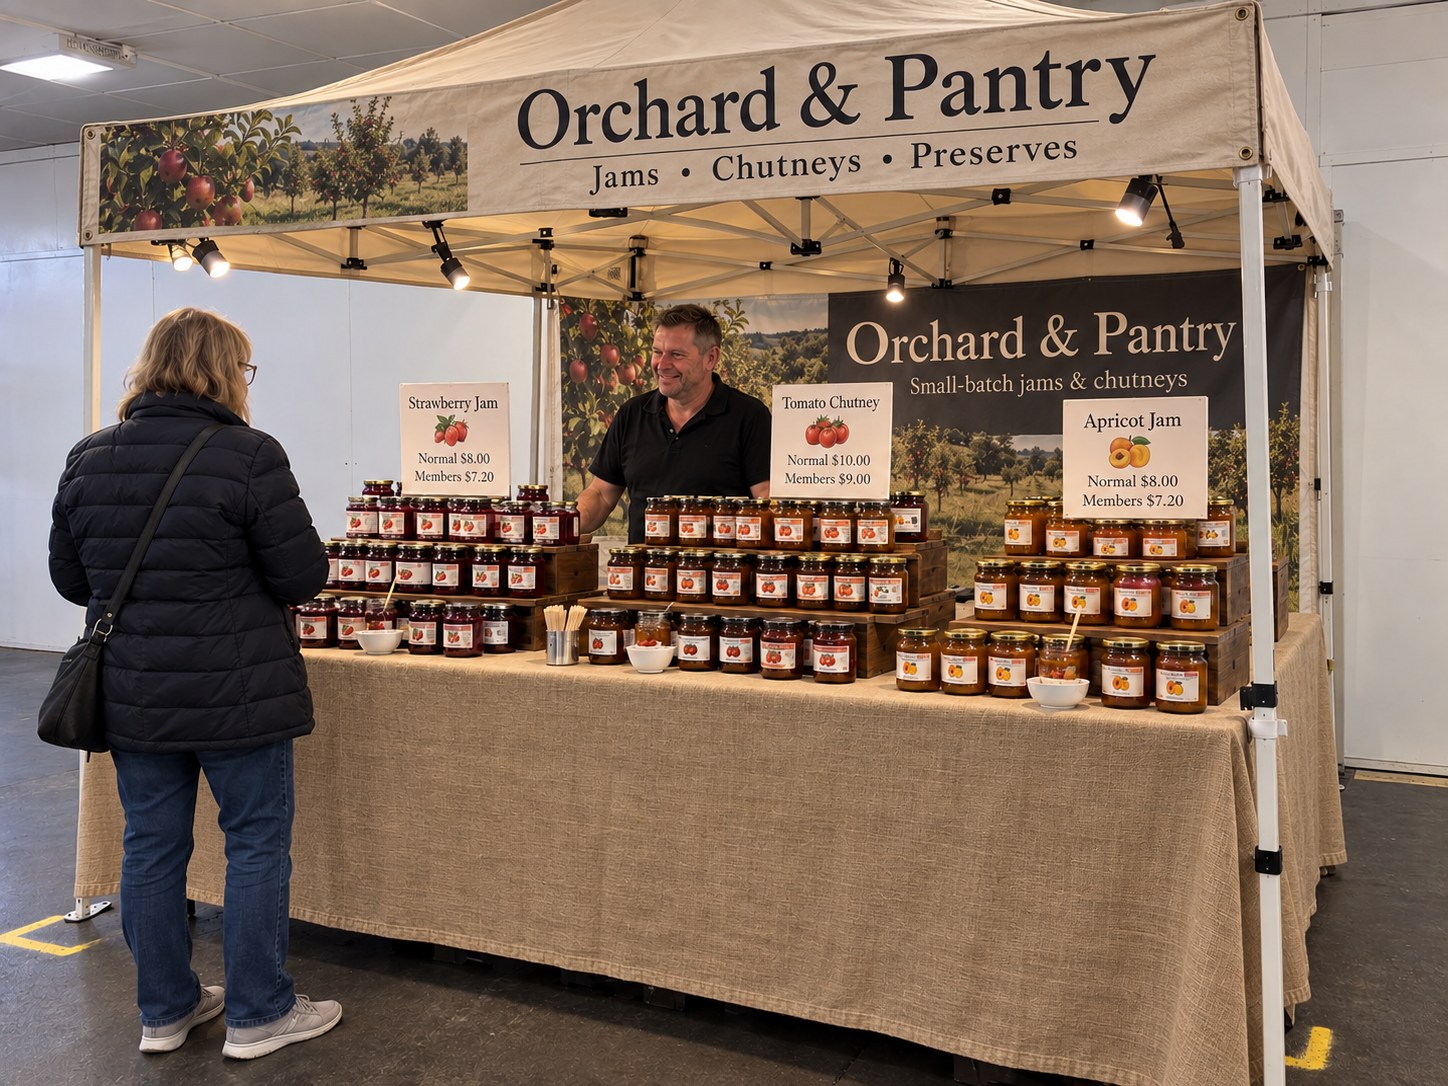
Hessian, stepped crates and an orchard story
A front marquee sign and a photographic backdrop explain what is sold and where it comes from. Grouped jars and stepped crates make flavours easy to compare. Hessian is one choice among many.
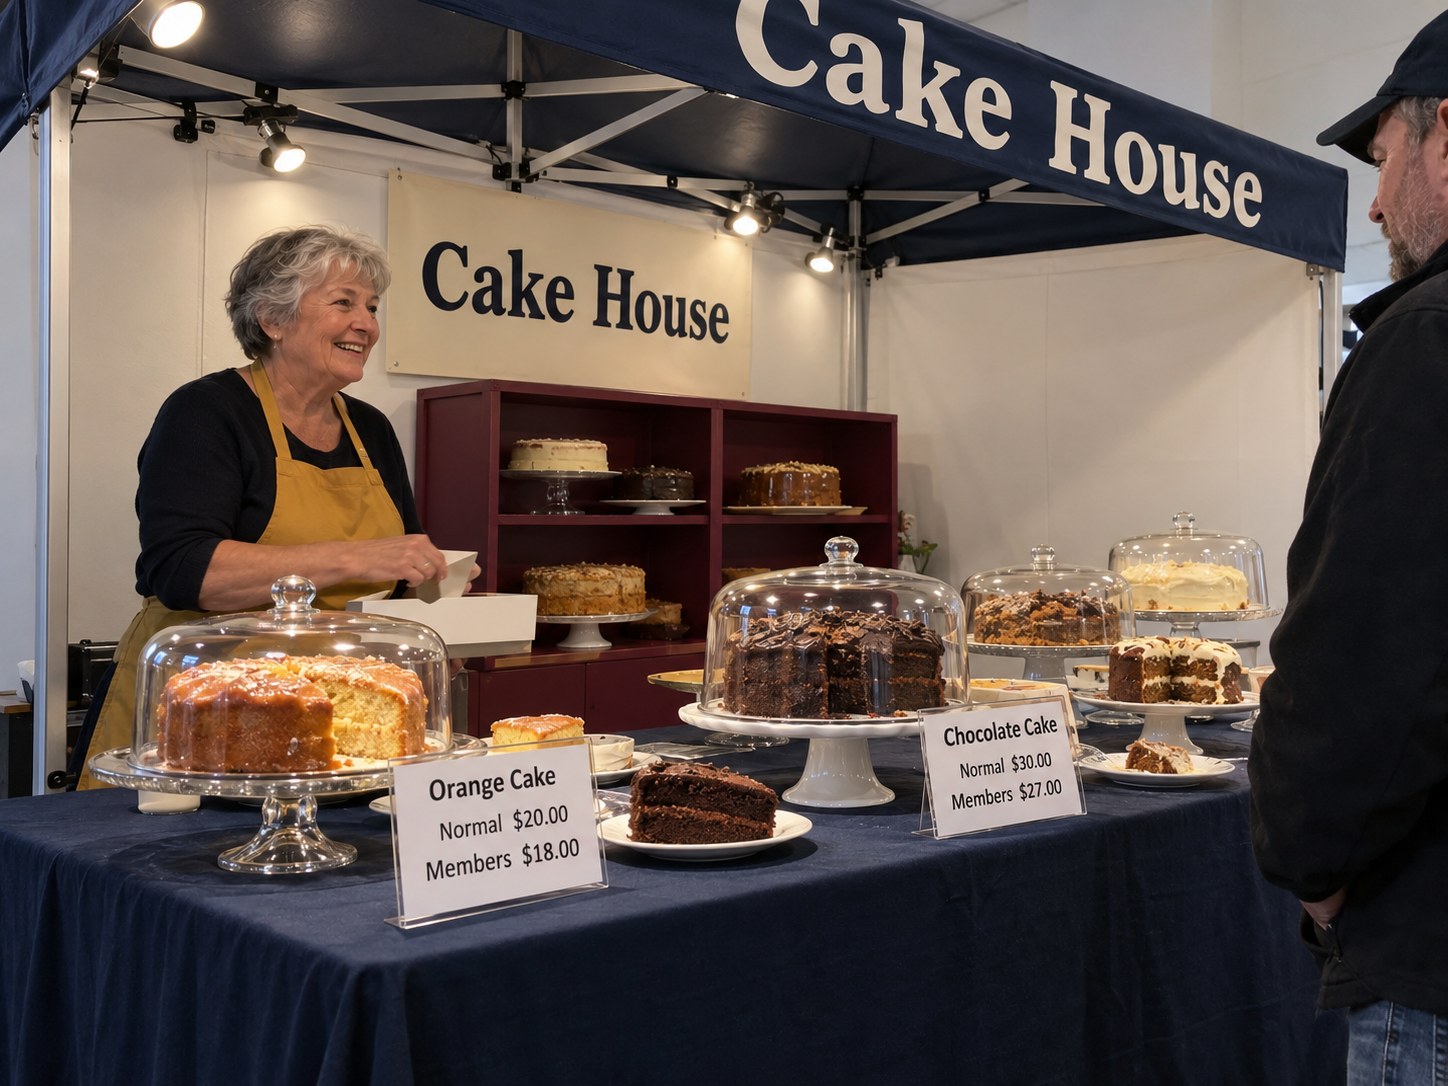
A navy frontage with cakes at different heights Cake stands and covered platters give individual products room to be noticed. Navy fabric and a dark marquee show that an authentic farmers’ market stall does not need an all-hessian finish.
Design a stall that can move
The market relocates twice a year. Every stall needs to be easy to pack up, move and put up again. Consider this before buying a cupboard, refrigerator, shelf or display counter.
Cupboards, refrigeration units, shelving and other substantial fittings need robust wheels or a properly designed wheeled base capable of travelling across bitumen. A small furniture castor that works on a smooth kitchen floor is not a suitable default for this job.
- Build in manageable modules. Use removable signs, detachable risers and shelves that pack securely. Check that each unit fits your vehicle, ramps and the narrowest doorway on its route.
- Choose a strong base. Fix castors to a load-bearing frame or reinforced base, not a thin cupboard bottom. For refrigeration, have the equipment supplier or a suitable technician confirm the mounting arrangement.
- Make it stable when parked. Specify suitable brakes, including wheel and swivel locking where needed. Larger wheels raise the unit, so check the resulting height and stability.
- Secure items for travel. Remove loose display pieces, keep heavy items low and secure doors and drawers. Follow refrigeration transport instructions and maintain appropriate food storage during the move.
- Pack in a repeatable order. Photograph the finished display, label light positions and keep signs, clips and leads together. Recreating a good stall should not depend on one person remembering every detail.
Which castors should you ask about?
Use the following as a conversation starter with a castor specialist. The final size, capacity and fitting must suit your particular equipment and route.
| Type | Where it may help | What to check |
|---|---|---|
| Industrial high-resilience rubber | Mixed indoor and outdoor surfaces; a useful starting point for bitumen routes. |
Outdoor rating, loaded capacity, suitable diameter and non-marking tread if required indoors. |
| Pneumatic, air-filled tyres | Rough or uneven outdoor surfaces where cushioning is useful. | Tyre pressure, puncture maintenance, load rating and increased mounting height. |
| Puncture-proof pneumatic-style wheels | Outdoor movement where avoiding punctures is important. | Actual cushioning and capacity; they are not automatically equivalent to air-filled tyres. |
| Small hard nylon or indoor furniture castors |
Some smooth indoor applications. | Avoid choosing these by default for bitumen; hard wheels transmit bumps and some indoor treads wear poorly outdoors. |
Wheel size: larger wheels generally pass over bumps more easily. Ask a specialist whether approximately 150–200 mm wheels are appropriate as a starting point for your route; this is a planning suggestion, not a universal specification. Allow for the extra height and any top-heavy load.
Load rating: supply the total loaded weight, including stock and the wheeled base. Do not simply divide by four and assume all four castors share the weight evenly over rough ground. Ask the supplier to allow for uneven loading and movement, and to confirm the mounting hardware and frame capacity.
Steering: two fixed and two swivel castors may give better straight-line control; four swivel castors may suit tight positioning. Ask which arrangement and brakes suit the route and unit.
Where to start
- Richmond Rolling Solutions: castor and materials-handling advice, with an Adelaide branch listed in its store finder.
- Fallshaw: wheel selection guidance and a distributor network.
- Industrial Truck & Equipment: Adelaide supplier with a range of industrial wheel materials and selection advice.
Take a photograph of the unit, its loaded weight, base dimensions and existing mounting points. Explain that it will cross bitumen, thresholds and any ramps. Ask for a complete fitted solution rather than choosing wheels by appearance or price alone.
Supplier references: Fallshaw selection guide; Richmond pneumatic castors. Links checked October 2026.
Choose lighting that does a job
Good lighting needs to do three things: light the products, the people serving and the backdrop. Start with a small number of adjustable lights, then check the result from the customer’s side before adding more.
| Format | Useful role | What to watch |
|---|---|---|
| Adjustable clamp LED spotlight or worklight | Direct light onto a product group or rear sign without taking up table space. | Clamp compatibility and secure mounting. A broad worklight can cause glare; adjust angle and brightness. |
| Rechargeable or hybrid LED worklight | A portable option when leads are inconvenient, or as supplementary light. | Runtime at the brightness you will use, battery and charger costs, and stable positioning. |
| Plug-in LED bar or batten | Even light beneath shelving or across a display. | Use a fitting intended for that installation. It will not necessarily light staff or the backdrop. |
| Compact LED on a stand | Flexible positioning where a frame clamp is unsuitable. | Keep stand legs and leads within the stall and clear of customers. |
| Festoon lights | Optional atmosphere. | They do not replace directed merchandising lighting. |
A practical starting arrangement
- Aim one or two adjustable lights across the front display so labels and food are visible.
- Add soft, angled light that lets customers see the seller’s face without shining into their eyes.
- Direct another light onto the banner or back display if it remains dark.
- Check fridge reflections, shadows under shelves and price-ticket readability from both approaches to the stall.
Choose a consistent light colour across the stall and look at your actual products beneath it. If buying for food colour, ask about colour rendering as well as brightness. Avoid mixing lights that make the same product look different in separate parts of the display.
Mount lights on suitable supports in accordance with their instructions. Keep leads tidy and clear of shopping space, and make the lighting easy to remove and reinstall for relocations. Plug-in portable fittings are simpler to relocate than permanent installations.
Examples to investigate
Arlec 20W 1600lm LED worklight with spring clamp at Bunnings is one adjustable clamp format. Its listed 5000K daylight output may suit some displays; test the effect on your food and check whether the clamp suits the intended support.
Ryobi 18V ONE+ Hybrid Worklight at Bunnings illustrates a portable hybrid format. Check power accessories, runtime and total cost before choosing a battery system.
These are examples to compare, rather than a prescribed shopping list. Availability, mounting suitability and performance should be checked before purchasing. The Bunnings worklight range provides other formats to consider.
Product links checked October 2026. Equipment illustrations below are generic concepts, not photographs of the named products.
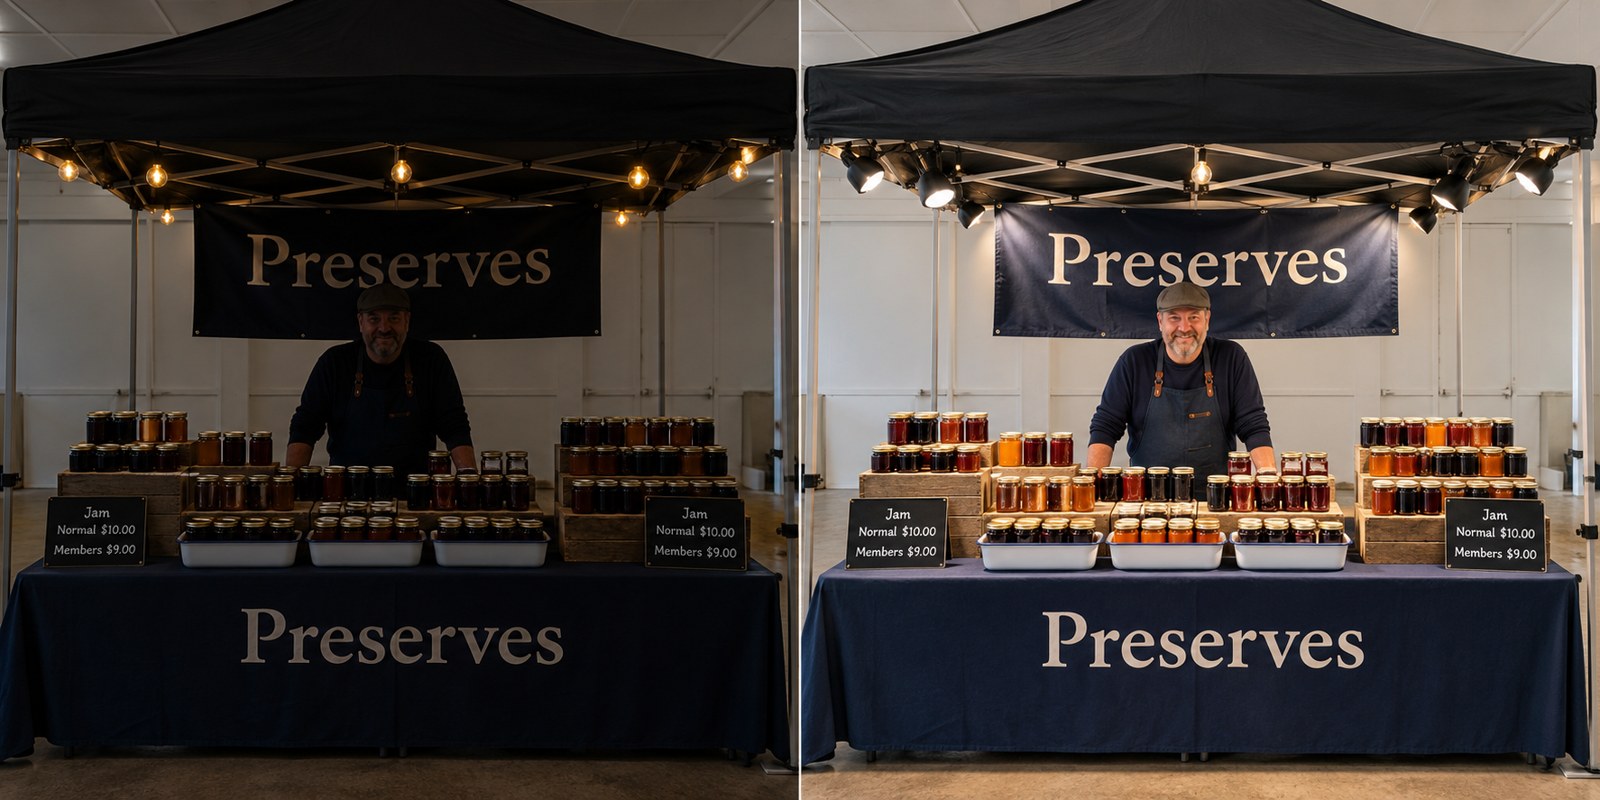
The same stall: poor lighting and improved lighting Left: decorative bulbs leave the jars, seller and rear banner in shadow.
Right: directed LED lights make all three easier to see. Compare the labels and the seller’s face, not just the brightness of the marquee roof.
Generated concept example, illustrating a display idea.
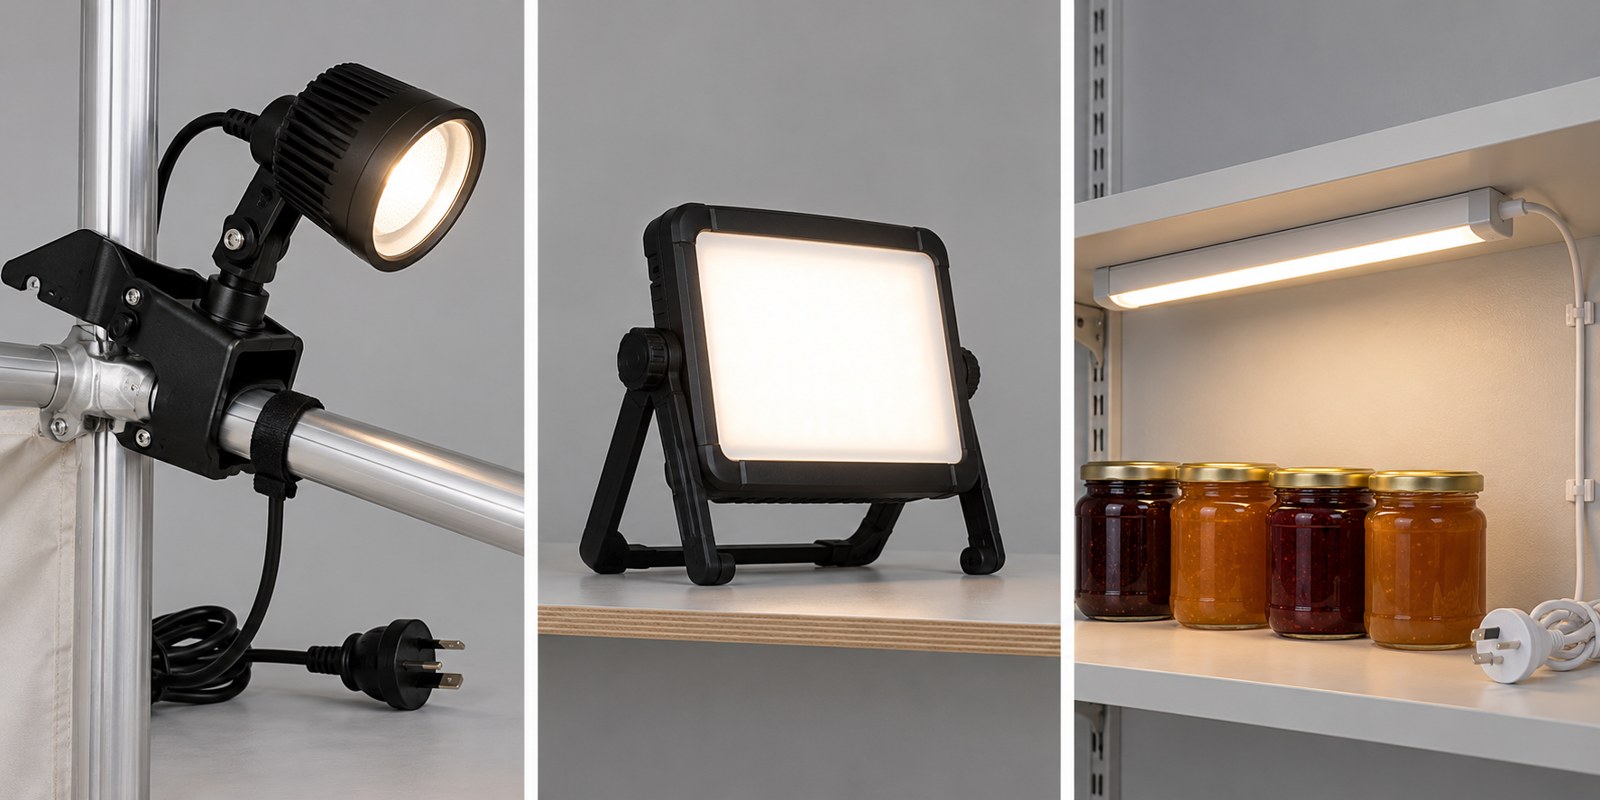
Three lighting formats to compare
Left: an adjustable clamp spotlight. Centre: a portable LED worklight.
Right: a light bar beneath a shelf.
These are generic illustrations of formats; confirm the actual fitting, mounting and electrical arrangement with the supplier.
Generated concept example, illustrating a display idea.
Choose three improvements for next Sunday
- Stand in the aisle and photograph your stall. Can you immediately see what you sell, who you are and the prices?
- Improve one display with height, grouping or a meaningful piece that reflects your business.
- Check again halfway through the morning. Replenish, consolidate and keep the stall inviting.
Your food should be the first thing customers notice. Your personality and producer story should give them a reason to remember you.